Creating an AI Assistant
Build your AI voice assistant that answers calls, books appointments, and helps your customers 24/7. This guide walks you through every step.
What You'll Create
By the end of this guide, you'll have:
- ✅ A fully configured AI assistant
- ✅ A professional voice that matches your brand
- ✅ Custom instructions for your business
- ✅ Phone number(s) assigned and ready to receive calls
- ✅ A tested assistant ready to go live
Time needed: 15-30 minutes
Video ID: VIDEO-ASSIST-001 Title: Creating Your First Assistant (Complete Walkthrough) Duration: 6-8 minutes Description: Watch a complete walkthrough of creating and configuring an AI assistant Status: 🔴 Not recorded yet
Before You Start
Make sure you have:
- A Voka AI account - Sign up at voice.vokaai.com
- A phone number - Purchase one first if you haven't already
Follow our Quick Start Guide for a faster overview, or continue here for the complete step-by-step process.
Part 1: Choose a Template
Step 1: Navigate to AI Assistants
- Log in to your Voka AI dashboard
- Click AI Assistants in the left sidebar
- Click the "Create New Assistant" button

Step 2: Select a Template
You'll see two types of templates:
Screenshot ID: ASSIST-002
Filename: ASSIST-002_template-selection.png
Description: Template selection modal showing all baseline and premium templates
Status: 🔴 Not started
Baseline Templates (Free)
These work immediately without additional setup:
-
Customer Support Agent
- Handles general inquiries and troubleshooting
- Empathetic and helpful
- Best for: General customer service
-
Appointment Scheduler
- Books, reschedules, and cancels appointments
- Collects customer information
- Best for: Service businesses, consultants, healthcare
-
Sales Assistant
- Qualifies leads and drives conversions
- Uses proven sales frameworks
- Best for: Sales teams, consultants
-
FAQ Handler
- Answers common questions accurately
- Provides helpful resources
- Best for: Support teams, information lines
-
Lead Qualifier
- Scores and routes leads automatically
- Professional qualification process
- Best for: Sales and marketing teams
-
Blank Template
- Start from scratch
- Full customization
- Best for: Unique use cases
Premium Templates (Require Integration)
These connect to your existing business software:
-
Square Appointments Manager
- Direct integration with Square
- Real-time booking
- Requires: Square account
-
Acuity Scheduling Assistant
- Seamless Acuity integration
- Professional scheduling
- Requires: Acuity account
-
Jobber Dispatch Coordinator
- Field service management
- Job scheduling and dispatch
- Requires: Jobber account
-
Housecall Pro Scheduler
- Home services scheduling
- Technician coordination
- Requires: Housecall Pro account
-
ServiceTitan Dispatcher
- Enterprise dispatch
- Advanced routing
- Requires: ServiceTitan account
Premium templates require connecting your account (Square, Acuity, etc.) before use. See Integrations Overview to get started.
Step 3: Choose Your Template
- Review the descriptions above
- Select the template that best matches your business
- Click on that template card
For this guide, we'll use the Appointment Scheduler as an example.
Part 2: Basic Configuration
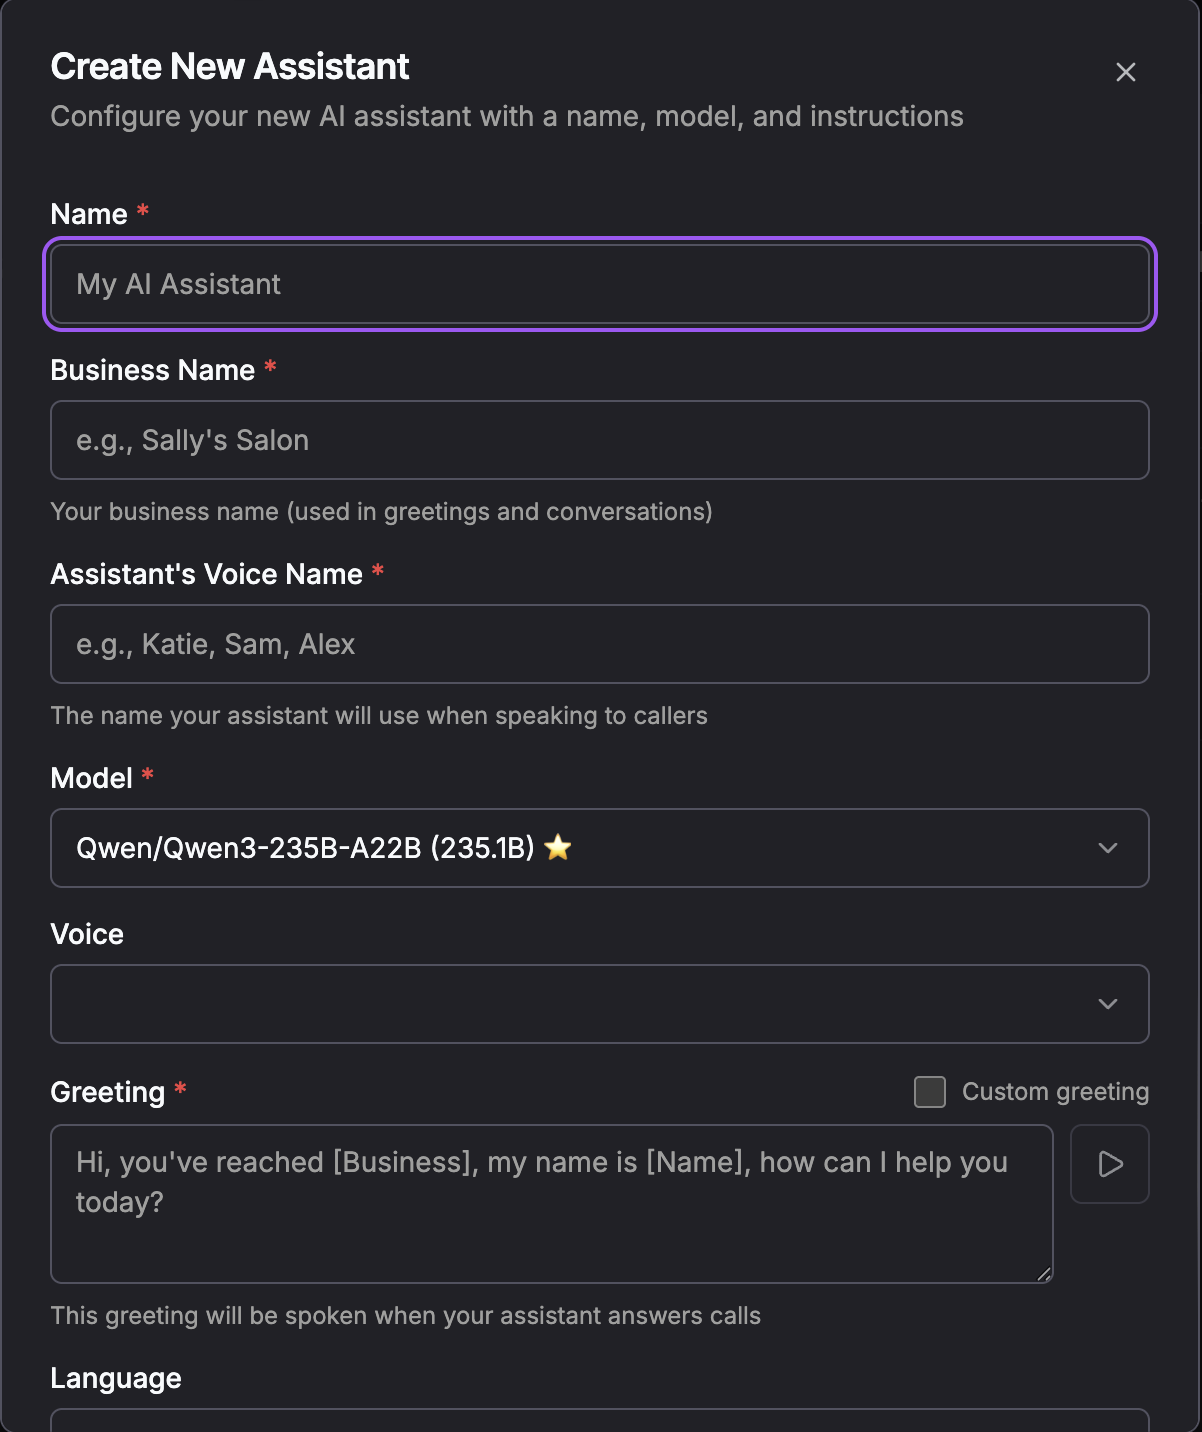
After selecting a template, a configuration dialog appears.
Screenshot ID: ASSIST-003
Filename: ASSIST-003_create-assistant-dialog.png
Description: Assistant creation dialog with all configuration fields
Status: 🔴 Not started
Name Your Assistant
What it does: This is how you'll identify your assistant in the dashboard.
Examples:
- "Main Reception Assistant"
- "Appointment Booking Line"
- "Customer Support - English"
- "Sales Qualifier"
Use descriptive names, especially if you'll have multiple assistants. Include the purpose or language if relevant.
Select a Model
What it does: The AI model powers your assistant's intelligence and responses.
Options you'll see:
- Recommended model (highlighted in green)
- Alternative models with different capabilities
For most users:
- ✅ Use the recommended model - It's pre-selected and optimized for your template
- The model name might look like
meta-llama/Meta-Llama-3.1-70B-Instruct
Different models have different costs per interaction. The recommended model balances quality and cost. Premium templates may use advanced models like GPT-4.
Choose a Voice
What it does: This is how your assistant will sound to callers.
Steps:
- Click the Voice dropdown
- Use filters (optional):
- Gender: Male, Female
- Language: English, Spanish, French, etc.
- Listen to voice samples by clicking the play button ▶️
- Select the voice you prefer
Popular choices:
- Astra - Friendly, professional female voice
- Orion - Confident, clear male voice
- Luna - Warm, welcoming female voice
Listen to several voices! The right voice makes a big difference in how customers perceive your business.
Select Language
What it does: The primary language your assistant speaks.
Options:
- English (most common)
- Spanish
- French
- German
- Italian
- Portuguese
- Japanese, Korean, Chinese
- Arabic, Hindi, Russian
Make sure your language selection matches your voice selection! An English voice won't work well for Spanish instructions.
Write Instructions
What it does: These instructions tell your assistant how to behave, what to say, and how to help customers.
Your template will include pre-written instructions. You can:
- ✅ Use them as-is (recommended for first-time users)
- ✏️ Customize them for your specific business
Example Instructions (Appointment Scheduler):
You are a friendly receptionist for [Your Business Name]. Your role is to help customers schedule appointments.

When someone calls:
1. Greet them warmly
2. Ask how you can help
3. If they want an appointment:
   - Collect their name
   - Ask for preferred date and time
   - Confirm contact information
   - Book the appointment
4. Provide confirmation and thank them for calling

Business hours: Monday-Friday, 9am-5pm
Services offered: [List your services]

If someone needs immediate help or has an emergency, transfer them to: [Phone number]
- Replace [Your Business Name] with your actual business name
- Update business hours
- List your actual services
- Add your emergency contact number
Click "Create Assistant"
Once everything looks good:
- Review all your selections
- Click "Create Assistant"
- Your assistant is created! But we're not done yet...
Part 3: Detailed Configuration
Now you'll see the assistant editor with several tabs. Let's configure the most important ones.
Agent Tab (Core Settings)
This tab controls your assistant's behavior and capabilities.
Name
- You can change the name here if needed
- This is just for your reference
Model
- Shows the AI model you selected
- You can change it if needed (usually not necessary)
Instructions (Detailed)
- This is where you fine-tune your assistant's behavior
- The text box includes helpful variables you can use:
{{vokaai_current_time}}- Current date/time{{vokaai_agent_target}}- Assistant's phone number{{vokaai_end_user_target}}- Caller's phone number{{vokaai_conversation_channel}}- How they're calling (phone/web)
Example with variables:
Current time is {{vokaai_current_time}}. If calling after business hours, let them know we'll call back during business hours (Mon-Fri 9am-5pm).
Greeting (Optional)
- What your assistant says when answering the call
- Keep it short and friendly
Examples:
- "Thank you for calling ABC Dental, how can I help you today?"
- "Hello, you've reached Smith Law Offices. How may I assist you?"
- "Hi there! Thanks for calling. What can I do for you?"
Your greeting is the first thing customers hear. Make it warm, professional, and match your brand's tone!
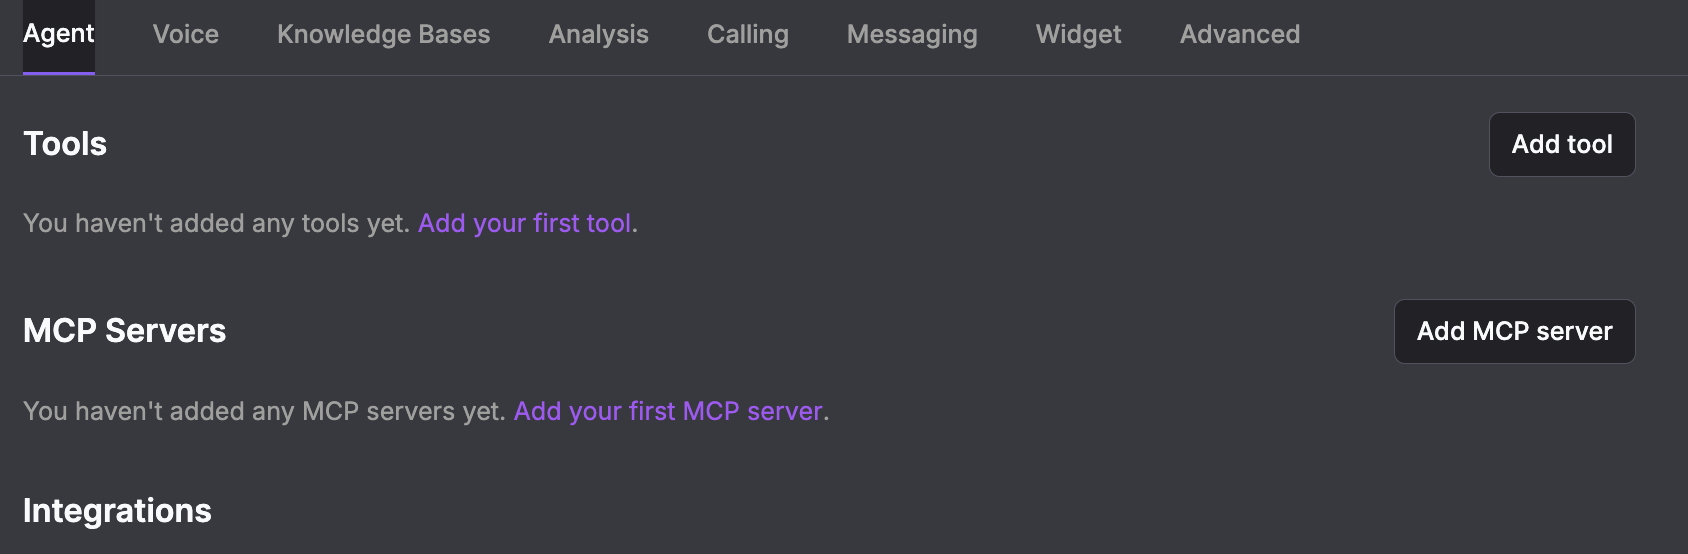
Tools (Optional)
- Transfer Tools - Transfer calls to a real person
- Webhook Tools - Connect to external services
We'll cover these in Advanced Customization

MCP Servers (Advanced)
- Model Context Protocol servers for advanced integrations
- Usually set up automatically with Premium templates
Learn more in MCP Servers Guide
Integrations
- Toggle connected integrations on/off
- Only shows integrations you've connected
Voice Tab (Voice Settings)

Fine-tune how your assistant sounds.
Voice Provider
- Voka AI - Our optimized voices (recommended)
- AWS Polly - Amazon's text-to-speech
- Azure - Microsoft's voices
- ElevenLabs - Ultra-realistic voices (premium)
Recommendation: Start with Voka AI provider for best results
Voice Model
- Shows available models for your selected provider
- For Voka AI: "NaturalHD" (recommended)
Voice Selection
- Same as in basic setup
- You can change your voice here
- Use filters for Gender and Language
Voice Speed (For Natural model)
- Adjust how fast your assistant speaks
- Range: 0.25x (very slow) to 2x (very fast)
- Default: 1x (normal speed) - recommended for most businesses
- Slower (0.75x) for elderly customers or complex information
- Faster (1.25x) for quick interactions
Scroll down to test your voice settings! Type sample text and click "Generate Speech" to hear how it sounds.
Screenshot ID: ASSIST-010
Filename: ASSIST-010_voice-playground.png
Description: Voice Playground interface showing text input and Generate Speech button
Status: 🔴 Not started
Transcription Settings
- Model: How speech is converted to text
- Language: Usually matches your voice language
- Leave these at default unless you have specific needs
Background Audio (Optional)
- Add background music or ambient sound
- Type: None or Custom
- Custom URL: Link to an .mp3 or .wav file
- Keep volume low (customers should hear the assistant clearly)
Speaking Plan (Advanced)
- Controls pauses and timing
- Defaults work well for most cases
- Only adjust if you notice timing issues
Calling Tab (Phone Configuration)
This is where you connect phone numbers to your assistant.

Assign Phone Numbers
This is critical! Your assistant can't receive calls without a phone number.
Steps:
- Click "Assign Numbers" button
- A list of your available phone numbers appears
- Click the + button next to each number you want to assign
- Selected numbers show a checkmark
- Click "Save" or "Assign"
You'll see assigned numbers in the table with:
- Phone number
- Status (should be "Active")
- Type (Local, Toll-Free, etc.)
- Tags
- Purchase date
Screenshot ID: ASSIST-012
Filename: ASSIST-012_assigned-numbers-table.png
Description: Table showing assigned phone numbers with status, type, and actions
Status: 🔴 Not started
Your assistant won't work until you assign at least one phone number. This is the most common mistake new users make.
Can I assign multiple numbers?
- ✅ Yes! Assign as many as you need
- All assigned numbers will ring to this same assistant
- Useful for multiple locations or different departments
To remove a number:
- Click the X button next to the number in the table
Settings
Support Unauthenticated Web Calls
- Allow calls from web widgets without login
- Usually leave this OFF unless you're using the web widget feature
AnchorSite
- Technical routing setting
- Default: "Latency" (automatically chooses fastest route)
- Only change if you experience call quality issues in specific regions
Analysis Tab
- View call history and analytics
- See Call Analytics for details
Screenshot ID: ASSIST-013
Filename: ASSIST-013_analysis-tab.png
Description: Analysis tab showing call history list with dates, durations, and statuses
Status: 🔴 Not started
Knowledge Bases Tab
- Upload documents your assistant can reference
- See Knowledge Base Guide for details

Advanced Tab
- Additional technical settings
- Most users won't need these
Part 4: Save and Activate
Final Steps
- Review all tabs - Make sure everything is configured
- Look for a "Save" button (usually top-right)
- Click "Save Changes" or "Update Assistant"
Verify Your Setup
Check that:
- ✅ Assistant name is correct
- ✅ Instructions match your business
- ✅ Voice sounds professional
- ✅ At least one phone number is assigned
- ✅ Integration is connected (if using Premium template)
Look for a status badge showing "Active" or similar confirmation that your assistant is ready.
Part 5: Quick Test
Before going live, do a quick test:
- Go back to the AI Assistants page
- Find your assistant in the list
- Click the phone icon (📞) or "Test Assistant" button
- Enter your phone number
- Click "Start Test Call"
You should receive a call from your assistant!
For detailed testing instructions, see Testing Your Assistant
Common Configurations
For Appointment Booking
Key settings:
- Template: Appointment Scheduler
- Instructions: Include your services, prices, and availability
- Integration: Connect Square, Acuity, or similar
- Phone number: Local number in your area code
For Customer Support
Key settings:
- Template: Customer Support Agent or FAQ Handler
- Instructions: List common questions and answers
- Knowledge Base: Upload FAQs, product docs
- Transfer tool: Set up escalation to live support
For Lead Qualification
Key settings:
- Template: Lead Qualifier or Sales Assistant
- Instructions: Define qualification criteria
- Integration: Connect to your CRM
- Transfer tool: Route hot leads to sales team
Troubleshooting
"My assistant isn't answering calls"
Check these:
- ✅ Is a phone number assigned? (Calling Tab)
- ✅ Is the phone number status "Active"?
- ✅ Did you save your changes?
- ✅ Did you try calling the correct number?
"The voice sounds wrong"
Solutions:
- Go to Voice Tab
- Change voice selection
- Test in Voice Playground
- Save changes
- Try another test call
"Instructions aren't working"
Common fixes:
- Check for typos in instructions
- Make sure instructions are clear and specific
- Avoid overly complex instructions
- Test with simple requests first
- Review and refine based on call transcripts
"Can't find my phone number to assign"
Solutions:
- Make sure you purchased a number first
- Check that it's not already assigned to another assistant
- Click "Refresh" or "Sync Numbers"
- Contact support if it's still missing
Next Steps
Now that your assistant is created:
- Test thoroughly - Make several test calls
- Set up integrations - Connect your business tools
- Review analytics - Monitor performance
- Customize further - Fine-tune instructions
- Go live - Share your number with customers!
Best Practices
Do's ✅
- Start with a template - They're optimized and tested
- Test extensively - Call multiple times before going live
- Keep instructions clear - Simple, direct language works best
- Use a professional voice - Match your brand's personality
- Monitor analytics - Review calls regularly and improve
- Update instructions - Refine based on real customer interactions
Don'ts ❌
- Don't skip testing - Always test before going live
- Don't use jargon - Keep instructions in plain language
- Don't forget phone numbers - Most common mistake!
- Don't make instructions too long - Be concise
- Don't ignore analytics - They show what's working and what's not
Need Help?
- 💬 Questions? Contact Support
- 📺 Visual learner? Watch our Complete Setup Video
- 📖 Deep dive? See Customization Guide
- 🐛 Issues? Check Troubleshooting